
Whether you’re a naturally handy person or simply looking forward to a new construction project, learning how to properly install baseboard is just one of the many things you can become a pro at. Installing baseboards anywhere can be tricky, but many people struggle most with installing baseboards around stairs.
While doing baseboards around stairs requires planning, measuring, and a bit of elbow grease, it can be easily done in just a few steps!
Whether you’re looking to spruce up the baseboards around your stairs or doing a full renovation, you should first learn the basics of constructing a baseboard as well as what materials are necessary to get the job done.
The Basics Of Installing Baseboard Around Stairs
Rounding, beading, and V-grooves are just a few of the terms associated with baseboards. If you’re not familiar with any of those terms, it wouldn’t be a bad idea to learn some of the basics necessary to properly install baseboards around stairs.
There’s need to worry, however, if you don’t know where to start. This step-by-step guide will run you through all of the things you will need before starting.
Installing baseboard around stairs, without a doubt, can be a do-it-yourself job, professional or not. However, with any job you do that involves measuring, cutting, sanding, and attention to detail, you want to make sure it’s done correctly. Any mistakes with this type of project can end up costing you a lot of money.
The first basic of course is understanding the lingo associated with baseboards. This is important, as you will need to know what certain terms mean in order to ensure you are purchasing the right baseboards that you like appearance-wise AND are compatible with the stairs they will be placed around.
Here are a few explanations behind common lingo associated with baseboard designs and such:
- Rounded/Rounding—also known as a “bullnose corner”, rounding refers to the top of the baseboard or the upper edge. This design creates the effect of a square upper edge and a rounded corner below, both measuring at 90-degree angles. This term more or less refers to the design of the molding on the baseboards. To see what a rounded baseboard looks like, click here.
- Beaded/Beading—this refers to the trim design of the baseboard in which the upper edge of the baseboard is rounded or curved. Beneath the curvature of the upper edge trim of the baseboard, there is a slight crevice or gap separating the rounded lower edge of the baseboard. For an example of a beaded baseboard, click here.
- V-grooves—are vertical grooves that run from one end of the baseboard all the way to the other end. These grooves have a slight dept to them and are often found on manufactured baseboards. For an example of a baseboard with a V-groove, click here.
Although these terms are mostly associated with the appearance/molding of the baseboard and not necessarily involved in the actual hands-on process of installing the baseboards around the stairs, they can be useful in at least helping you construct an idea of how you want the baseboard around the stairs to look, especially if you’re making your own baseboards.
Likewise, you can also ask yourself:
Are the stairs wooden, carpeted, linoleum, etc.?
Does the wall leading to the stairs already have a baseboard?
Is there more ease in installing the baseboards if there’s a skirt on the stairs versus placing mitered cuts around each individual step?
These are all relevant questions to think about how to answer before installing baseboards around the stairs.
How To Properly Do Baseboard Around Stairs
As far as the trim or design of the baseboards goes, there is no right or wrong way, however, when it comes to the actual installation of the baseboards around the stairs, you will want to do that properly the first time around.
Remember, if you plan on purchasing baseboards with a rather expensive trim, not installing them properly the first time can be quite costly, especially if the job has to be done over more than once. For this reason, it’s important to try and do as best of a job the first time.
The best way to ensure that you properly install baseboards around stairs is by following a series of steps rather than by trying to complete all aspects of the project at one time. Doing a handy job like this should be fun, right?
Even if you’ve never installed baseboards before, you’ll have all the more reason to be proud of yourself after successfully completing each step!
Equip Yourself With Safety Gear
The first thing you should do in preparing for a job like this is to make sure you equip yourself with the proper tools and safety gear necessary. Because this job involves wood, heavy machinery, and you kind of need your eyes to see, of course, it’s recommended that you wear safety goggles.
These will protect those beautiful eyes of yours and prevent any injuries!
In addition to safety gear, you will also need most of these tools and materials in order to install the baseboards around the stairs:
- Measuring tape
- An orbital sander or 100-grit sandpaper
- A miter box
- Pine or hardwood planks (if you’re making your own baseboards)
- Heavy-duty nails
- Carpenter’s glue
- A speed square or angle finder
Once you have your tools and materials on hand, you are one step closer to getting the job done!
Take Proper Measurements Of All Areas Around The Stairs
This step is probably one of the most crucial, as one wrong measurement could disrupt the whole process of installing the baseboards around the stairs properly. As with any kind of project like this, you will want to measure anything that is relevant to the proper installation of the baseboards including each step and the area around it.
To begin this step, you should first start by taking measurements of the area where the actual baseboard will be installed. This includes the lengths where the baseboards will be installed as well such as around the rise and run of each individual step.
For example, if you plan on installing a skirt around the stairs before installing baseboards or there is already a skirt around the stairs, you will only need to measure the area of the skirt on which the baseboard will sit.
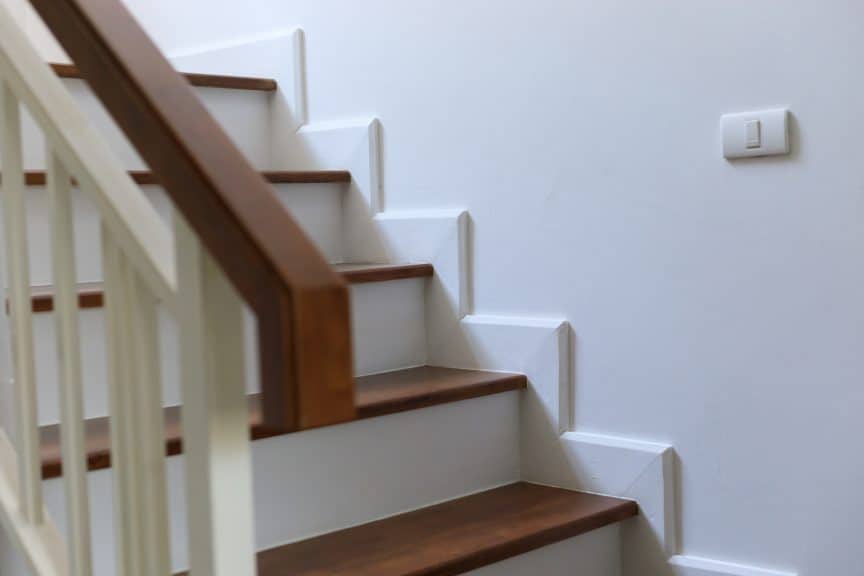
To be clear, a skirt for stairs is not an actual skirt, but rather the trim that covers the structured, corner sections of the stairs. If the stairs didn’t have a skirt, you would have to endure the hassle of placing baseboard down each and every individual step including down every riser and over every tread.
Additionally, you would have to measure every angle.
It’s not required to have a skirt for your stairs but having one will make installing the baseboards much easier. Otherwise, if the stairs aren’t already equipped with a skirt and you don’t plan on changing that, you will have to perform the tedious task of measuring each length of the stairs and doing so requires a lot of work and attention to detail.
“Measure the lengths along which you want to install baseboards. Add an extra 10 percent to the lengths in case of errors during the installation. Attaching baseboards to stairs can be tricky; therefore, be certain of the lengths and measurements before you cut the actual baseboards.”
Source: How To Install Baseboards On Wood Stairs
Nevertheless, taking proper measurements without a stair skirt can be done, but be sure to pay close attention to each measurement.
Select The Baseboards You Want To Use
Whew! All that measuring was a lot of work, right? Now comes the fun part of selecting the baseboards you want to use. Baseboards are available in a wide range of varieties. This can be the most enjoyable part of the process if you have a good eye for baseboard design and can spot a great molding from a mile away, however, there are some things to take note of first.
When selecting the baseboards, you want to use for the stairs, it’s important to take note of the types of stairs such as whether they are wooden, carpeted, linoleum, etc.
For wooden stairs, in particular, it’s best to choose a baseboard that will match the color of the wood. If you’re unable to find baseboards of the same color, you can always paint the baseboards before placing them. The same applies if you can’t find baseboards of a certain color or finish that you would like to use.
When buying baseboards, try to select those with lengths close to the ones that you measured on the stairs. This will save you time and money, as you won’t have to cut off as much access length that you don’t need. You also won’t have to cut in as many places and risk cutting any of the baseboards becoming too short.
Building your own baseboards is a complete process on its own that requires, once more, lots of measuring, cutting, and more measuring. Even though it adds to the task of installing baseboards around stairs, it’s ideal if you would like to create your own trimming design and whatnot. For a step-by-step process on how to make your own baseboards for stairs, visit here.
Determine The Angle Of The Stairs
For this next step, you will need to determine the exact angle of the stairs. This involves measuring the angle between each individual step. It would be easy to assume that the same angle applies to every step, but as a precaution, you should still measure the angle of each and every step.
If you’re unsure at first of how to measure the angle of the stairs, you can always use scrap baseboard that the new baseboard will be taking the place of if applicable.
Because stair angle is the measure of the angle your stairs descend at, you will want to start measuring from the top of the stairs and down to the bottom rather than the opposite. The fastest way to determine the angle of stairs is by using an angle finder or speed square.
These simple tools do all of the measuring and finding of an angle for you. All you have to do is place either one between each individual step. You could also optionally use a leveler with the speed square to make sure the angle you measure is exact.
If the stairs are equipped with a skirt, this step isn’t necessary, as there is no space to fill in between each step since the skirt is in place. However, you will still at some point need to correctly determine the angle of the skirt in order to correctly place the baseboard along the length of it.
Additionally, to better help you with determining the angles of the stairs, you can also trace each step with the help of the scrap baseboards.
Apply Your Measurements To The Baseboards And Trim As Necessary
Once you’ve correctly measured and determined the angles of the stairs, it is now time to apply those measurements to the actual baseboards that will be installed. If you used scrap baseboards to help you measure the angle of the stairs, transfer those findings onto the new baseboards.
The same goes for if you used an angle finder or speed square.
Once you’ve transferred the measurements of the lengths and the angles, you can begin labeling the points at which you wish to place the nails in each of the baseboards. Afterward, you can begin the exciting yet anxiety-inducing part of the process of cutting and sanding each baseboard.
This part of the process can be scary, as there’s no turning back once you’ve begun to cut each baseboard. If you find later on in the installation process that you’ve cut a baseboard too short and measured incorrectly, you’ll have to go back to the drawing board and remeasure, re-determine the right angle, and find a new baseboard to use.
To make sure you cut and trim the baseboards at the right angles and measurements, you may require the help of a miter box. This special tool allows you to make straight, accurate, and seamlessly clean cuts across pieces of wood.
“A miter box consists of two components—a hand saw whose teeth are set for crosscutting (cutting against the grain of the wood) and a ‘box’ that is pre-fashioned with slots on both sides to help the woodworker make accurate angled cuts . . . A miter joint, the tool’s namesake, is made by fitting together two 45° cuts to form a right-angled corner.”
Source: How To: Use A Miter Box
Once you’ve successfully cut and trim each of the baseboards, sand the edges of all pieces so that they will able to perfectly fit together when forming an edge. This will not only allow for a seamless fit, but it also gives the baseboards a clean, polished look.
Install The Baseboards Around Stairs
When you first begin the installation process of the baseboards around the stairs, you should first line the baseboards up and set them in place without nailing or gluing them. This will allow you to make sure each baseboard fits correctly before permanently being nailed into place.
Doing so will also prevent you from having to rip out a baseboard should it not fit correctly. Likewise, you can also use some type of adhesive such as tape to help keep the baseboards in place until you’re ready to nail them down. Once the baseboards are all lined up evenly and everything looks perfect, you can begin nailing them down.
Oftentimes there will not be much for the nails to hold onto behind the baseboards and walls. In this case, you can use the carpenter’s glue in addition to the nails to securely hold the baseboards in place.
“Chances are there is not going to be anything for your nails to hit behind the wall so nail the pieces that you can or know where they will be hitting studs. A good construction adhesive will have to be used to attach the other pieces that can’t be nailed.”
Source: Installing Baseboard On Stairs
Once you’ve applied the carpenter’s glue or similar adhesive, where necessary, to the back of the baseboards, you should apply pressure to each piece until the adhesive has completely dried.
Make sure that when you’re applying adhesive to the back of any baseboards that you’re also applying it in between each of the joints where the baseboards meet as well.
Tidy Up The Workspace
After the glue has dried and the baseboards are fully set in place, brush off or wipe away any excess sawdust from the baseboards.
If any nails remain visible after the baseboards have been permanently placed, you can easily cover them up with any type of caulking material.
Make sure that any caulking material you use matches the color of the baseboard. If needed, you can also mix any paint you used on the baseboards with the caulking material to get a color that matches closely.
Share this Post
Giovanni Valle is a licensed architect and LEED-accredited professional and is certified by the National Council of Architectural Registration Boards (NCARB). He is the author and managing editor of various digital publications, including BuilderSpace, Your Own Architect, and Interiors Place.