
Applying baseboards can be tedious, but it’s pretty straightforward on traditional corners. It might take some time and care, but it’s a project you can easily do on your own. However, when you want to apply baseboards to bullnose corners, you have to be prepared to be a little more patient.
You need to measure and cut your baseboards to install them on bullnose corners. However, since bullnose corners are rounded, you must cut three 22 1/2° angle pieces to fit around the curved edge rather than the two 45° angle pieces you need for sharp corners.
In the rest of this article, I’ll detail what you need to know to install baseboards on bullnose corners. This also includes explaining bullnose corners and baseboards, in case this is your first home improvement project.
Instructions for Installing Baseboards around Bullnose Corners
Installing baseboards on rounded corners is a little more of a time-consuming project compared to angular corners. However, it isn’t as daunting as it may seem.
You just need to ensure you have the necessary tools and follow all the steps. But first, let’s cover the meaning of these terms.
Baseboards: Baseboards are the strip of material you often see lining the bottom of a wall where it connects with the floor. While they can be made of tile and vinyl, they’re most popularly made out of wood and are meant to cover where the wall and floor meet in a decorative way.
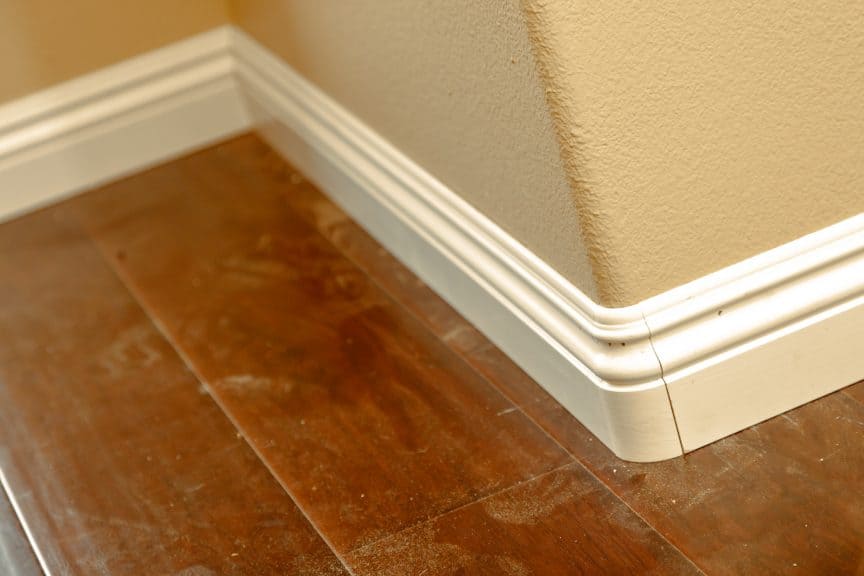
Bullnose Corner: If you’re wondering if this article is for you, you should determine if you have bullnose corners in your home. A bullnose corner is a rounded outside corner (the “point” where the two walls meet just outward).
Like traditional outward corners, bullnose corners are typically 90° angles, so those are the angle degrees I’ll be using for the rest of this article.
Supplies Needed for Installing Baseboards around Bullnose Corners
- Measuring tape
- Pencil (A carpentry pencil is best, but you can use any regular pencil.)
- A saw (A miter saw is preferred to cut the angles you need, but any saw you’re comfortable using will do as long as you can cut precise angles.)
- Wooden baseboards
- Wood glue
- Caulk
- A hammer and nails OR a nail gun
- Wood filler (optional)
How to Install Baseboards If You Have Bullnose Corners
Once you’ve assembled the materials you need, follow these steps to install baseboards around your bullnose corners:
1. Line Up Your Baseboards for Measurement
You’ll want to measure the wall length you’ll need from one end to the edge of the bullnose corner you’re installing around.
Since you’ll be trimming your baseboard around the corner, you’ll also want to measure that so you can account for that measurement when you cut your baseboard. You’ll have three final measurements and cut three pieces of wood.
2. Mark Your Measurements
Using your pencil, mark the wall where you’ll install your boards and the baseboards to know where to cut them.
(Tip: Deduct about ⅜ of an inch or about 9 ½ mm from the length you measured when marking your baseboards for cutting.)
3. Trim Your Baseboards
Adjust your miter saw blade so that it’s set to cut at a 22 ½° angle (this is different from typical corners where you’ll cut two 45° angle pieces) and cut your three baseboard pieces (one for each length of wall and one to cover the gap between the corners).
Remember, you can always trim extra wood off, but you can’t add it back. When in doubt, cut less than you think you might need to.
4. Check Your Measurements
Once you’ve cut your baseboard pieces, fit them to the corner you’re installing them around.
If you’ve cut accurately, there shouldn’t be much of a gap between the baseboard and the wall when the three pieces fit together.
Any gap should also be equal on both sides of the corner.
If you notice too much space, repeat steps 1-4 again until you’ve trimmed as much as you need to.
5. Glue It Together
Once your baseboard pieces are cut to fit perfectly around your bullnose corner, you’ll want to glue your pieces together.
I recommend assembling your pieces before installing them so you can make any necessary adjustments more easily.
Use wood glue to attach one wall side of your baseboard to your angle piece and let it set and dry completely.
Repeat this process with your other baseboard piece.
6. Fit and Nail
Now that your baseboards are assembled, you’ll fit the whole piece against the wall, and around the corner, you’ll install it too.
Once it’s in place, you’ll take your nail gun or hammer and nails and hammer your baseboards to your wall.
There is no rule as to how many nails you need. However, spacing your nails between 5-6 inches (12.7-15.25 cm) apart should be fine for most baseboards.
7. Filling in the Seams
If you notice any open seams in the wood where your baseboard pieces fit together, you can use wood filler to make them less noticeable.
You’ll also want to use caulk to carefully fill in gaps between your baseboard and the wall if your baseboards aren’t entirely flush against it.
Once you’ve installed your baseboards, the difficult part of this project is all behind you, and you can leave them as is or paint and finish them however you like.
Final Thoughts
Bullnose corners are rounded outside corners, making installing baseboards more tedious than typical corners.
However, installing baseboards around these corners isn’t much different, nor is it much more complicated than installing baseboards on more angular corners.
Make sure you take accurate measurements and cut three pieces of your baseboard at 22 ½ ° angles so they fit around your corner without creating a large gap between your baseboard and your wall.
You can do this simple home improvement project yourself with patience and attention to detail.
Sources
- Bend Tool: What Is a Bullnose Corner
- Youtube: What Is a Bullnose Corner (for Baseboards and Trim)
- Remodelista: Remodeling 101: Consider the Baseboard (and What You Need to Know)
- Youtube: How To Install Base Trim On a Bullnose or Rounded Outside Corner
- Bend Tool: 9 Obvious Questions You Are Going to Ask When Nailing Baseboards
- This Old House: How To Install Baseboard
- Youtube: FAQ Miter Saw Angle Adjustment
- Youtube: How To Install Baseboard Around a Bullnose Corner
- Bend Tool: How Do You Cut Baseboard Around Bullnose Corners
- Bend Tool: Installing Bullnose Corners for Baseboards
Share this Post
Giovanni Valle is a licensed architect and LEED-accredited professional and is certified by the National Council of Architectural Registration Boards (NCARB). He is the author and managing editor of various digital publications, including BuilderSpace, Your Own Architect, and Interiors Place.