
Usually an afterthought in design or a background style element in the non-design world, crown molding is generally a quick, pretty job that doesn’t need much fuss, although it is very detail-oriented work.
Crown molding offers a fairly easy way to make a room look finished and elegant at a lower cost while covering problems. It’s not an essential part of a room, but it does go a long way to add class and value to a home without adding too much strain to your budget.
It is also a strangely heavily-debated topic. Should it be in every room, or only in a few? What should it be made of, and why? What options are available style-wise? Are there any kinds of rooms that shouldn’t have crown molding under any circumstances?
Here are some of the answers to the most pressing questions about this debated detail of the design.
What is Crown Molding?
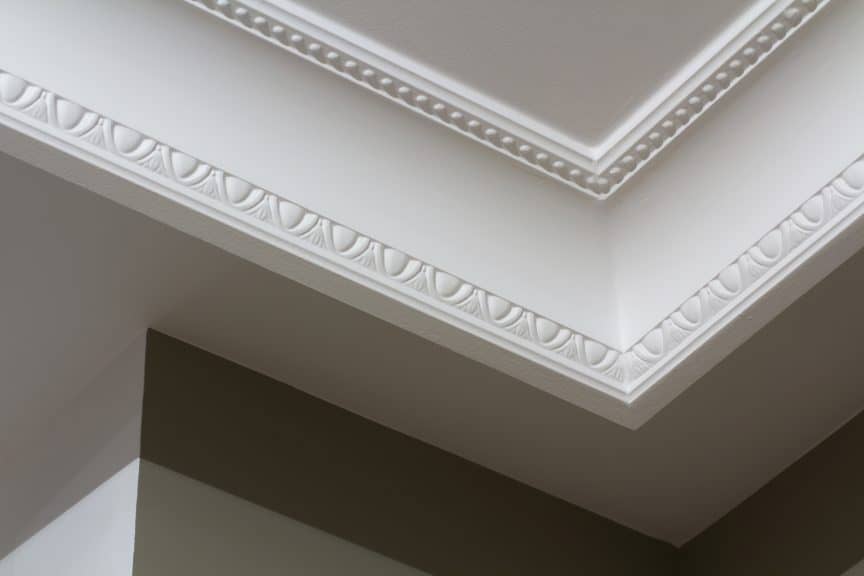
Molding as a term generally describes any trim pieces in a home, including baseboards and window trimming. However, crown molding refers specifically to the decorative edging that lines the upper seam between interior walls and the point where they meet the ceiling. This article from Home Advisor puts it elegantly by comparing the molding of a room to a painting’s frame, which is fairly apt.
Crown molding’s main function on a practical level is to cover gaps and imperfections between the wall and ceiling. It’s been used since the days of ancient Greece, where, according to this article from Hunker, it was used to subdivide large spaces into smaller areas. Until the 1850s, all molding would have to be made onsite by a carpenter or an artist (for a more elaborate style), but after the invention of large-scale planning machines, it became easier for more people to access cheaper, more uniform variants.
Crown molding shouldn’t be confused with cove molding. Cove molding is much thinner, and is concave, with a “scooped-out” profile that bows in toward the wall. It can be used in both the top and bottom edges of a room and is less likely to have hard angles and edges. It also comes in fewer designs, as cove molding is used specifically to smooth out edges rather than fill or enhance them. While cove molding is beautiful in its own right and offers the practical benefit of being thinner, it isn’t appropriate for spaces where adding to the room’s design is the goal.
This is the reason why many older homes have such durable and impressive crown molding, as it was a standard from the time of its inception to keep rooms from deteriorating for as long as possible in a time when renovations were considerably more difficult and expensive.
Now, though, crown molding is used to offer another aspect of personal style to a room or the overall feeling of the house. It softens the edges of a room, making it seem less clinical and more accommodating.
Different Kinds of Crown Molding Materials
Generally, crown molding comes in one of three categories of material, each with its benefits and drawbacks to consider before adding them into your home’s design. There are also smaller varieties within those material choices, which add more nuance to the decision.
Plaster is the most popular choice, as it is easiest to reproduce patterns and designs in this material and produces some of the most classic and elegant materials. It’s lightweight, but considerably more expensive than other options, as it is slightly more difficult to shape and detail. Plaster is considered a slightly outdated material, given that it’s not as durable as newer synthetics, and the older versions were often made with somewhat hazardous materials, but modern plasters are just as safe as those synthetics if a little bit easier to wear down.
Wood is another popular for crown molding. It’s more durable and easier to install than plaster, making it slightly lower maintenance, but it also much more costly, as the designs have to be cut into the wood and are harder to reproduce reliably. Molding can be made from either hardwoods or softwoods, depending on your color and style preference, although hardwood molding is the most expensive option given its rarity and the difficulty of working with it.
The third most popular option is a composite material. A composite molding is usually made of foam, polystyrene, PVC, or vinyl, and is another option in which designs are easily reproducible. Composite materials are the easiest of the three to install and is the most lightweight and durable option. It is also often the cheapest option, meaning that it is perfect for the more economically minded home decorator. It’s sometimes preferred over wood or plaster because composite materials don’t react to environmental factors like humidity and temperature as readily as the others do.
Each style has its price point, but it’s important to value quality in equal measure to the economy. It’s fairly easy to tell apart a cheap, flimsy, badly made piece of molding because of the simplicity of its construction, and so it would be pointless to use it in the design as it’s just going to distract and detract rather than actually accomplishing what you want with it. There’s an excellent piece from Inviting home on various myths related to crown molding, which you can read here.
One-Piece versus Three-Piece Crown Molding
Before getting into the details of incorporation and installation, it’s important to consider the actual mechanics of the installation, and the benefits and drawbacks of each kind.
One-piece crown molding is, as the name suggests, a single piece of trim nailed to a backing piece between the wall and ceiling. It’s a much simpler, if more precise, installation, in that all you have to do is cut and paste (in the literal, non-computery way).
The problem with this type of molding is that it doesn’t respond well to extreme changes in temperature or humidity. If you live in a place with intense, humid summers or a long rainy season, then you will almost definitely face issues with gapping between the top of the mold and the ceiling when it is warped or swollen by the water in the air or the heat of the day.
To solve this problem, go with a three-piece crown molding. A three-piece molding consists of a flat-stock cornice (or top detail) that is nailed or adhered directly to the ceiling, a lower detail that is nailed directly to the studs in the wall, and the crown detail, which is nailed and adhered to the previous two pieces. This structure allows for more movement and adaptation from the material without as much obvious gapping and warping between each piece and the ceiling itself.
There are drawbacks to three-piece molding as well, of course. It isn’t conducive to smaller styles, given how its structure works. Because of this, it might not be appropriate for a smaller, closer room, as it might overpower other design elements and command attention in a way that you don’t want.
For more information about which structure to choose, you can read this article by a long-time molding installation expert, which is part of his series about crown molding and its proper use as a design element in a room.
How to Incorporate Crown Molding into a Home’s Design
Your crown molding should reflect the style you choose for your house. There are as many styles of molding as there are decoration aesthetics for homes, so it’s worth looking into several different styles before making the final choice. If your style is a bit simpler, you might consider going with a more modern, blocky molding style. If you base your style in antique pieces and French construction, you might consider a Louis XV style to crown the tops of your rooms.
Again, there are hundreds of styles to choose from, and they all depend on the same few factors:
- Your budget: how much are you willing to set aside from the beginning of the project to spend on the molding itself? How much are you willing to put aside for installation costs? The average range for crown molding installation is between $500 and $1600 but can go up into the $3000 range for more elaborate hardwoods.
- Your home’s dimensions: are your rooms larger and more open? Or are they smaller and closer together? Is it more of an open plan, or are the rooms more individualized? Some house designs may not offer themselves well to the installation of crown molding and might make it more of a hassle than it’s worth.
- Your style: Do you want the molding to be purely functional, or do you want it to be a design feature? Do you want to call attention to it, or have it as an understated piece in the room? Certain design aesthetics are dramatically enhanced by crown molding, while others disregard them entirely.
You should also consider your installation team. If you are detail-oriented and capable of basic renovation work, you could install it yourself. Installing molding isn’t particularly tricky other than ensuring that each piece is cut flush to the wall and the adjoining piece. This article is an excellent how-to guide for installing your crown molding yourself.
However, if you’re not one for getting your hands dirty with a project like this, it’s worth looking into local contracting companies to find a decent quote for the job.
Should You Put Crown Molding in Every Room?
There’s an argument to be made for the functional ideal of putting crown molding in every room. It saves on fixing aesthetic imperfections as they become apparent later (although molding itself does not do anything to prevent structural imperfections from causing problems and might even make it harder to recognize them) and can serve to improve the flow of style from one room to the next.
Generally, though, designers agree that the focus for crown molding should be in the main rooms of the house. Putting crown molding in other side rooms is purely an aesthetic choice and isn’t necessary, although it may increase the cost of the room’s design initially, as it’s harder to cover the gaps between the wall and the ceiling without any kind of molding and will take a bit more time to finish.
It is also possible to completely forgo crown molding. This is often done in homes with a more modern, sleek aesthetic based on sharp lines. It is slightly more difficult to maintain this style, as again, it means detailing all of the edgings in your home to account for any gaps or inconsistencies in the paintwork and can be difficult to pull off as it requires such a specific room design as to not look unfinished or strange.
In addition to this, it is a good idea to decide against crown molding in rooms with another outstanding feature that could be highlighted instead. To put crown molding over wooden ceilings would look out of place and, in the worst cases, tacky. Some design elements make it impractical to incorporate crown molding. Beam ceilings are one of these designs, as well as being featured in and of themselves. There is no way to practically install crown molding around exposed or lowered beams, and besides, they shouldn’t be overshadowed when such hard work and dedication went into their construction.
Nevertheless, crown molding can bring charm and a sense of completeness into spaces that are otherwise plain or uninteresting on their own. If you do decide to install crown molding, several things ought to be considered before the final installation begins.
Deciding Which Rooms Need Crown Molding
The rooms that need crown molding are the most heavily trafficked. This includes living rooms, family rooms, dining rooms, and kitchens, and can even be extended to bathrooms and bedrooms if you want to keep things consistent. It’s a matter of budget a lot of the time, as putting in elaborate crown molding all over your house is expensive and time-consuming.
One type of room that people frequently worry about installing crown molding in is a child’s bedroom or playroom. They have valid concerns about the structural durability of the molding in a room that’s going to see so much activity and don’t want to install something that could potentially harm the child. That being said, there are certain kinds of high-density materials that are made for this kind of situation, that provide durable protection for the room that might save on issues later. (You might also consider adding chair-rail (or roughly waist-height) molding to offer further protection for your walls.)
To decide if crown molding makes sense in a room, ask yourself the following questions:
- Will it improve the space? Will adding in crown molding appealingly draw your eye, making the room look bigger or airier or more elegant, or will it make the room look cramped or like it’s trying too hard?
- Will it fit the budget? Can you afford the elaborately carved wooden molding that would be perfect for your bedroom, or would it be better suited to the main gathering places of the house, leaving the side rooms with simpler, more economical furnishings?
- Will it fit the schedule? Do you have the time and talent it takes to properly install the style of molding you’ve selected? Have you worked with your contractors to decide how much time they will devote to this project in relation to the total renovation time?
- Will it make you happy? Will you kick yourself in six months when the flaws in the paint at the upper edges of the wall inevitably show through, or when there’s noticeable gapping there?
If you have any no’s, consider finding a different option or reevaluating what you need to do to change your answer. If your answers are all yes, then it’s time to consider which style and color of crown molding to include in the room’s design.
Deciding Which Style of Crown Molding to Use
Generally, the style of crown molding should be consistent to the point of being in the same design family (art deco, modern, Victorian, etc.) throughout the house, but the details of each individual trim set depend largely on the individual room’s style. It is, of course, a design feature, and that design, more often than not, serves a purpose.
Crown molding can be used to trick the eye in certain situations, drawing the eye up and out in a smaller room to make it seem bigger or making a room appear more upmarket or classy with a slightly more elaborate design.
For instance, in a small room with low ceilings, using a slightly projecting crown molding with a simple design can pull the eye up and away from the wall, making it look taller than it is. It’s possible to use the wrong style in this situation by using a more complex design that hugs the wall rather than the ceiling, thereby emphasizing how short it is, but this shouldn’t stop you from using any molding at all. Once again, it comes to a matter of considering the space in the style.
It can also be used to compliment another design feature, most often the central lighting fixtures of a room. A simple set of inset lights might call for a more elaborate molding or a molding that creates a recess for them to shine from, while a centerpiece chandelier might be most appropriate with simple, elegant molding that doesn’t draw much attention away from it. Consider what in your room is the focal point, and go from there.
Deciding How to Terminate Your Crown Molding
Terminating a piece of molding is the technical term for stopping it at the edges of a room where it wouldn’t make sense to continue it uninterrupted. These trouble spots include points where different elevations of ceiling meet, inset doorways, archways, and window settings.
There are four main ways to terminate a piece of crown molding:
- A hanging return is when a piece of molding “folds” back in on itself when it meets an edge by placing a tapered piece of molding against the exposed end of the trim to cap it off as a single continuous piece. This style of termination is good for inset doorways or hallways that lead into a room with higher ceilings.
- Finial returns are terminations where a small matching cap piece is made in the same style as the molding and installed at the ending juncture. This is slightly more dramatic than a hanging return and is used in trouble spots where it is appropriate to slightly compliment the separation, such as in an open floorplan home between rooms.
- Corbel returns take the emphasis of finial returns and bump it up to maximum. They are used to purposefully draw attention to the end of a piece of trim by placing a large and intricate cap piece at the ending juncture. Corbel returns are good for important rooms with an elegant style, such as main living areas, offices, and formal dining rooms.
- The final termination method is, by contrast, the most subtle: a crown molding dissolve. Crown molding dissolves are true to their names in that the point is to create the illusion that the molding is “dissolving” into the ending juncture, meeting up somewhere out of sight with another piece of molding. Crown molding dissolves are excellent for trouble spots like odd corners and feature pieces like fireplaces, where the goal is to divert attention rather than draw it.
Deciding How to Finish Your Crown Molding
Once you’ve decided on a style for your molding, you’re going to want to decide how you want to finish it all. With wooden molding, you have the option to stain it to compliment the other colors going on in the room. A lighter stain is a good compliment to a more plain, white, or off-white room if you’re not interested in drawing too much attention to it, but a darker stain in that same situation can make it stand out. Darker stains are also an excellent way to highlight and frame brighter wall colors.
If you’re interested in painting it, however, it’s a good idea to get swatches of potential color matches and hold them against the wall color that you’ve chosen to see if they’re a good match. White and its various shades have always been a standard trim color, although some criticize its use as cliché or overdone. But painting your molding a different color or a darker shade of your wall color can add another level of interest to your design.
You can paint your molding before or after it is installed, but it’s recommended that you do the more intensive paintwork before installation, and only do final touchups after, as it makes the process easier and more streamlined. You should do any staining before installation to avoid mess and drip patterns.
Common Mistakes to Avoid When Installing Crown Molding
As with any other home improvement project, you should always consult with a professional before you begin, even if you intend to do the actual work yourself. It’s easy to make a mistake with a job that requires attention to detail, and much more difficult to fix it after the fact than it is to prevent it from happening at all.
Always make sure to follow the old carpenter’s adage of “measure twice, cut once.” Because crown molding installation requires miter cuts, made with specialized tools (miter saws), it can be fairly easy to accidentally cut your trim pieces too short for the room, or to the wrong angle for joints and terminations. Here is a handy guide on how to measure and cut crown molding from The Home Depot.
As mentioned before, most of the painting and all of the staining for your molding should be done before installation, but this does not mean you shouldn’t sand down the edges of the pieces or sand out imperfections that happen as a result of the installation process. Touching up sanded surfaces with paint will always look more finished than leaving exposed imperfections like nicks and loose splinters.
Finally, be sure to finish the joints in your molding by filling in any gaps, as leaving exposed gaps defeats the purpose of installing the molding at all. Gaps can be filled in either with putty, joint compounds, or caulking.
Your Crowning Achievement
It may seem like a small thing to worry about the trimming details of a room, and yes, some of the time, it is. Sometimes, the trim in a room is just there to cover things that you wouldn’t want to be seen by the casual visitor, or that you don’t want to see daily. If you’re unconcerned about adding a design element to your room, it is possible to select a simple thin wooden trim from your local hardware store and tack it in place yourself. This will get the job done, covering the edge and hiding most imperfections.
Sometimes, though, you want to add something slightly extra to a room to make it stand out and seem a bit more yours. You may want it to look more traditional or more upscale. Perhaps you even have a knack for design that you want to showcase. Whatever the reasoning behind it, deciding on what kind and color of crown molding you add to space can be fun! As long as you are satisfied with the results of your renovations, then you’ve made the correct choice.
Share this Post
Giovanni Valle is a licensed architect and LEED-accredited professional and is certified by the National Council of Architectural Registration Boards (NCARB). He is the author and managing editor of various digital publications, including BuilderSpace, Your Own Architect, and Interiors Place.