
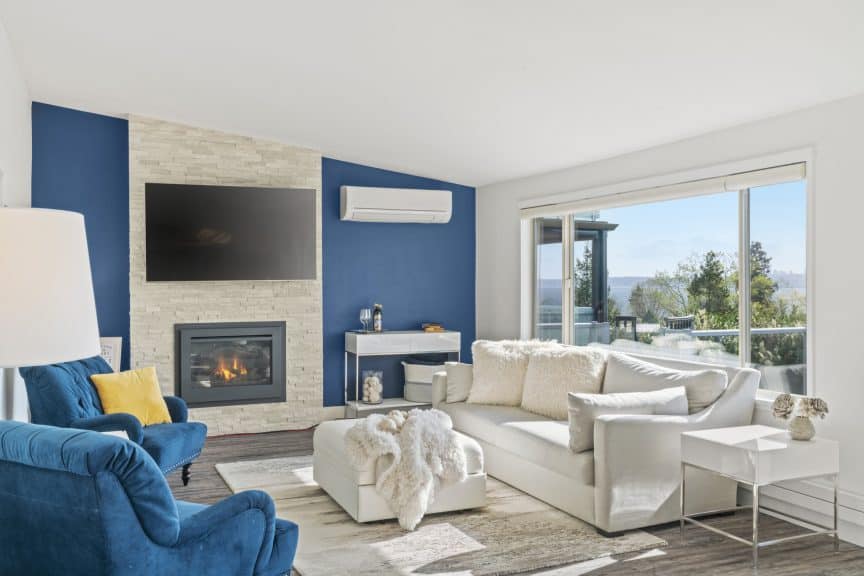
When it comes to remodeling a fireplace in your home, you may want to consider adding a stacked stone fireplace. Not only does this option allow you to improve the overall appearance of your fireplace, but it also helps you save money compared to other solutions that require more extensive work.
Here’s how you can remodel your fireplace with stacked stone in 8 simple steps:
- Plan out your stone-stacked fireplace.
- Choose your preferred stone.
- Dismantle your existing fireplace.
- Create a frame that extends to the ceiling.
- Install a wood beam mantel.
- Install a cement board.
- Apply a scratch coat over the cement board.
- Install the stacked stone.
The rest of this article will explain the steps mentioned above in more detail to help you remodel your fireplace using stacked stone. Hopefully, with the help of our guide, you won’t need to hire a home architect or laborer.
1. Plan Out Your Stone-Stacked Fireplace
A stone-stacked fireplace is the ultimate DIY project — it looks amazing, costs next to nothing to build, and can be completed in just a few days. You’ll just need to spend a little time planning and gathering materials before getting started.
You need to consider several things when planning out a fireplace remodel. The first is the design and layout of the stacked stone surround. You also need to decide what type of stacked stone veneers will work for your fireplace project, plan the structure of your new hearth, and sketch out the design on paper.
2. Choose Your Preferred Stone
Remodeling with stacked stone can be a relatively inexpensive and time-efficient way to update your fireplace. One of the first things you’ll need to do is choose a suitable stone for your project. The key is to choose a material that compliments your home and fits in with your overall room aesthetic.
In terms of durability, many consider granite to be the most durable stone on the market. Granite is a rock that has been heat-treated and then polished to give it a smooth appearance. Cultured stone is also an excellent option because it’s more realistic than faux stone, which has more of a cement look.
3. Dismantle Your Existing Fireplace
Dismantle your existing fireplace by removing all of its components. You’ll need to remove the mantel, firebox, and other decorative elements. Remove the firebox grate and the bricks that are used for the firebox.
Also, remove any bricks that may be holding up the mantel.
Ideally, you want to remove all the wood paneling and drywall to strip the fireplace down to the original framing.
4. Create a Frame That Extends to the Ceiling
The frame around the fireplace can be upgraded with trim that extends all the way to the ceiling, giving the fireplace an elegant look and turning it into the focal point of your room.
To create this opening, start by removing any old mortar from the sides of your fireplace. Next, frame the opening between the floor and ceiling using 2×6 (38 x 140 mm) lumber. Nail the framing together to attach it to your wall and ceiling using 3-inch (7.62 cm) nails. Alternatively, use a screwdriver or drill and screws to mount the framing.
Use nails and glue as much as possible, and use metal connectors when you absolutely need to. Keep the frame square so that it’s strong enough to hold the stone later on.
5. Install a Wood Beam Mantel
Whether you use it to heat your home or just for decoration, you’ll want to add a mantel over the fireplace to add style and sophistication. A floating mantel is easy to install and can be done in a matter of hours.
A fireplace mantel is a decorative shelf that can hold your TV, pictures, and other decorative pieces. You can use this space as an entertainment center. Fireplace mantels are usually made of hardwood which is easy to clean and doesn’t scratch easily. You can install a floating rustic mantel yourself at home.
6. Install a Cement Board
A cement board is a sheet of cement used in place of drywall to hold the stacked stone in place. It’s easy to install, though it takes a bit more time than drywall. A cement board provides a smooth surface for applying the stacked stone.
The cement board must be cut to fit the dimensions of the space where you’re installing it. You need to measure the opening of the fireplace and the length of the wall where you’ll be installing the cement board. Use a level to mark your measurements on the wall using a chalk line.
When you have your measurements marked off, you can now cut out the areas you marked using a jigsaw or circular saw, depending on what type of cement board in question.
7. Apply Scratch Coat Over the Cement Board
When installing stacked stone on a fireplace, a rule of thumb is to install the scratch coat over the cement board. The key to a professional-looking installation is a quality scratch coat. This layer of mortar is applied over the cement board before the stone is set.
It’s vital to work quickly and precisely when applying this layer. If you haven’t covered the whole area with a scratch coat, you’ll have to apply it again before you can set the stone in place. So make sure to apply a uniform layer covering all the cement boards in your fireplace.
8. Install the Stacked Stone
After applying the scratch coat, you can start installing the stones. It’s best to use smaller pieces (about 6 to 8 inches or 15 to 20 cms) because they’re easier to handle and are less likely to crack. Use a mason’s line and level as a guide when starting each row to ensure that each stone is straight, level, and in line with the other ones.
Final Thoughts
Stacked stone is perfect for any fireplace remodel because it’s durable, low maintenance, and easy to install. I hope this article has helped you understand how to remodel a fireplace with stacked stone.
Sources
- Houzz: Stacked Stone Fireplace
- Cultured Stone: Find the Cultured Stone that Fits Your Vision
- NorthStar: Does my Stone Fireplace Have to Extend to the Ceiling
- Etsy: Floating Mantel
- The DIY Playbook: Fireplace Makeover – Demo + Adding Cement Board
- Do It Yourself: Mason’s Line
Share this Post
Giovanni Valle is a licensed architect and LEED-accredited professional and is certified by the National Council of Architectural Registration Boards (NCARB). He is the author and managing editor of various digital publications, including BuilderSpace, Your Own Architect, and Interiors Place.