
Crown molding can be a quick and easy way to update any room in your home. Simple, yet elegant, crown molding makes an immediate statement when someone walks into a room. It also adds value to a home.
If you’re a DIY enthusiast, you may be tempted to put up crown molding yourself. However, if it’s your first time with crown molding you will want to have some guidance before you begin your project. Joining crown molding, especially, can be a tricky endeavor.
Let’s take a look at how to join crown molding successfully in 15 easy steps. You can buy the pieces and do this as a weekend project fairly easily if you have the tools and patience. Dive in and see if this DIY project should be on your to-do list.
Filling Crown Molding Joints
Wood expands and contracts according to the weather. Because of this, you will need to make sure your joints and seams in crown molding are done correctly so there will be no gaps in the weeks to come.
To make sure you have no gaps in your crown molding, here are 15 easy steps you can take to correctly fill in the joints in crown molding:
- Cut your first piece of crown molding and put it on the wall
- You may want to cut it at 0 degrees with a 30-degree bevel
- For the backing, get a piece of flat wood scrap smaller than the crown molding
- Put your bonding agent in a square on the backing
- Place the backing, bond side on the wall, under the end of the crown molding where the join will be. Make sure to leave some overlap for the next piece
- Measure for your next piece of crown molding and cut appropriately (See below)
- Dry fit in the next piece of crown molding until it fits snugly. Cut in small pieces and take your time
- Place bonding on other half of backing for the next piece of crown molding
- Place the bonding agent on the end seams of both pieces of crown molding you are about to join
- Press against wall and slide into place next to original molding
- Get it as level as you can with the first piece
- Use finishing nails to nail it up
- If you need to, tighten the trim up using a chisel and small pieces of wood scrap
- Depending on your trim, use either wood putty or spackling to cover the seams and nail holes
- Sand the crown molding down – you don’t want to see a difference on either trim
If you don’t fill your joints correctly, you could end up seeing gaps in your crown molding within a couple of weeks. This means you will have to redo your work. You don’t want that.
Before you try to fill gaps in your crown molding, you should know exactly how to cut and install your trim. If you need to fill the joints, you must first put the crown molding on the wall. Read below to see how to do it.
Cutting and Installing Crown Molding
Before you begin cutting and installing crown molding, you will need to gather your tools. Having the right tool is half the battle when doing any DIY project. Here are the tools you will need for your project:
- Coping Saw
- Pneumatic Finish Nailer
- Compound Miter Saw
- Electronic Stud Finder
- Wood Rasp
- Sandpaper
- Level
- Tape Measure
- Caulk Gun
Along with tools, you’ll need the materials for the job. They will include:
- Crown Molding
- Masking Tape
- Wood Stain Or Paint
- Scrap Lumber Backing
- Finishing Nails
- Pencil For Marking
- Bonding Agent Like Caulk or Wood Putty
- Wood Filler or Spackling
Once you have all your tools and materials, it’s time to begin your work.
Follow these step by step instructions to install your own crown molding:
- Cut the corners of your molding
- Measure and mark the wall
- Cut the first measured piece
- Cut the next piece to fit an inside corner
- Understand how the pieces fit together
- Cut the molding at a 45-degree angle
- Cope the joint
- Check the fit
- Attach the molding to the wall
- Make miter cuts for the outside corners
Cut the Corners of Your Molding
Don’t be fooled – cutting the corners is going to be the hardest part of this process. This is not like a trim piece, as it doesn’t fit straight but rather at an angle. This is where you will want to use a coping saw, since a coped joint is simply tighter than a mitered joint. If you only have a power mitered saw, that will work too, although not as well. You can also hide any gaps in a coped joint with some caulk and a bit of paint or stain.
Because cutting angles will be the most difficult part of this project, we’ll go over it in step-by-step instructions:
- Adjust your saw to cut the molding at a 45-degree angle
- Cut the crown molding upside down
- The ceiling edge (or top) will rest on the horizontal base of the saw while the wall edge (or bottom) will be against the wall’s vertical fence
- For the inside corner on left side of wall, pivot saw blade 45 degrees to the right and save right end of cut
- For the inside corner on right side of wall, pivot saw blade 45 degrees to the left and save left end of cut
- For the left side of outside corner, swing blade to the left and keep right end of cut
- For the right side of outside corner, swing blade to the right and keep left end of cut
Remember that the decorative part of crown molding is usually on the bottom so you can keep it against the fence when making your cut.
Measure and Mark the Wall
Measure the wall for the length of your molding. Mark the wall with your pencil to show the bottom edge of your molding. This seems like a simple process, but this is where many people make a mistake. Make sure you measure correctly so you’re not wasting your materials and time.
Cut the First Measured Piece
Remember the old adage – measure twice and cut once. This will be a straight piece so you will want to cut in a straight line at a 90-degree angle. Both of your angles will butt against the side walls.
Cut the Next Piece to Fit an Inside Corner
Now, you have to move the saw guide to about a 45-degree angle and make sure you set the molding in place. For a straight cut, your edges will need to be pressed firmly up against the saw table as well as the vertical side fence.
Understand How the Pieces Fit Together
If you’re not a professional, fitting the pieces together can be confusing. The molding is upside down, so the edge against the vertical fence will be the bottom of the molding and the edge against the table will be the top of the molding. It helps to think of your table as the ceiling. Always dry fit your pieces before affixing them to the wall.
Cut the Molding at A 45-Degree Angle
When you put the molding in the correct position, use a 10-inch saw blade to cut a 45-degree angle. Make sure you cut the molding angle in the right direction. For an inside corner, the bottom of the molding should be longer than the top part of the molding. For an outside corner, the top of the molding will be longer than the bottom.
Cope the Joint
Coping a joint can be a little complex. Here are some steps to help you through it:
- Scribe the end of one molding to the face of the other
- Darken the front edge with a pencil and use a coping saw to make the cut
- Hold your thumb firmly against the side of the blade to guide the saw
- Start slowly and be sure to cut at a slight angle
- Cut out small pieces
Check the Fit
Make sure you check your piece against a scrap piece of the molding to reveal any potential gaps that need to be trimmed. Use your coping saw to saw off the highest points.
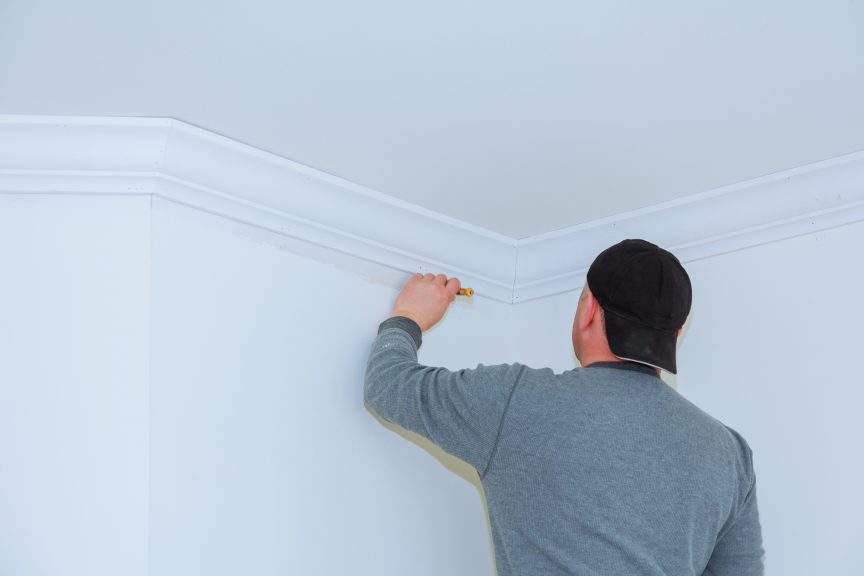
Attach the Molding to The Wall
Now is the moment of truth. You’re going to take the molding to the wall and push the end into the corner. Make the fit as tight as possible and then attach it to the wall. Use your caulk gun to cover up any gaps in the joint. Note that you may need another piece of molding to finish out the wall.
Here’s where you start filling the joints of your crown molding. During this step, you can use paintable caulk, as many people do. However, there are some professionals that swear by wood putty. Wood putty comes in handy if you’re using a wood stain on your crown molding. It also works well for woodwork you intend to paint.
Wood putty is flexible so it can expand and contract with the movement of wood. Remember to use latex putty when you’re using latex paint.
If your crown molding will have a clear, wood finish, then you can use acetone-based wood filler for filling nail holes or those small imperfections. You can either apply this with a putty knife or, for deeper penetration, you can buy a plastic tube and an applicator tip.
For molding made of urethane foam, you can use either latex spackling or drywall compound to finish off the joints and nail holes. Here’s a good rule of thumb when installing crown molding: use caulk on the edges of the molding and wood putty for the filling. This gives the trim a professional look, especially when you use wood putty in the nail holes and finish with a stain or painting.
Whatever bonding agent you use, make sure it is able to be sanded and painted over. You want a strong bond that will move with your crown molding. See above for step by step instructions on filling joints in your trim.
Make sure if you’re using a tube of caulk or putty that you cut only a small portion of the tip off before you put it in the caulking gun. You only want a thin stream of the bonding agent to come out of the tube. If you have any more come out, you risk making a mess all over your crown molding. A thin stream should be all you need. Your gaps should not be that wide if you cut the pieces correctly.
Make Miter Cuts for The Outside Corners
The outside corners have to meet exactly. If they don’t, your entire project will be compromised, and you may have to start over. It’s why measurements and testing pieces are so critical to installing crown molding.
If you do make tiny mistakes, use caulk and paint to cover it up and give it a good finish. No one will be able to tell. However, large mistakes will show so don’t leave any large gaps or obvious mistakes.
Types of Crown Molding
If you are shopping for crown molding, you may have seen there are several to choose from. From traditional wood to PVC, there are several different materials you could use. It depends on your home and your style. Let’s take a look at your choices and the pros and cons of each.
| Crown Molding | Pros | Cons |
| Solid Wood | Traditional; Adds warmth to a room; Many different styles | Shrinks and swells with changes in the weather |
| MDF | Can be used in rooms where trim is painted; Low-cost; Many different styles | May need painting; Easier to dent or nick |
| Plaster | Good for grand interiors; Elaborate styles | Made to order; Costly; Heavy and can be easily cracked |
| Polyurethane | Works in most installations; Less expensive; More stable; Rot and insect-repellent; Elaborate styles | Softer than wood; Dents easily; Only good for painted applications |
| Flex | Used with curved walls and window bays; Rubbery material | Costly; Needs to be special-ordered |
| PVC | Good for bathrooms or exteriors; Will not warp or rot | Limited style options; Hard to paint but needs to be painted |
| Polystyrene | Used for quick room redesign; Can be cut with scissors | Thin texture; Fuzzy edges |
If you have a grand foyer, you may want to go with plaster for your crown molding, as it can be developed into an elaborate, custom-made style that fits your home. If you’re remodeling a guest room and don’t want to spend a lot of money, you may want to choose a polyurethane-type crown molding. Many people choose wood trim because of the character and warmth it adds to a room, but you should pick the crown molding you feel works best in your home or workspace.
Types of Fillings for Crown Molding
We’ve discussed the types of bonding agents you can use with crown molding. If you’re still wondering what the best filling for your crown molding is, here are some basic fillings and their features:
- Caulk – Caulk is good to use on very small gaps and holes. It will shrink a bit when it dries so it’s not great to use for larger gaps where the filler needs to hold its shape. It also can’t be sanded so don’t use it where it can be sanded. It can be either silicone or acrylic. Silicone caulk is waterproof. It can become distorted over time.
- Spackling – Good to fill nail holes or to fill gaps where you need the filler to hold its shape. You can also shape it after it dries.
- Wood Putty – Good for filling in gaps and joining seams. Wood putty can be sanded and expands and contracts with wood. It can also be painted.
- Wood Filling – Good for filling in nail holes gouges. It can also be used to fill outer corners of molding.
- Glue or Liquid Nails – Use this to adhere the crown molding to the wall. You would put this on both the wall and the backside of the molding to attach the molding. It is not good to use as a complete filler.
Match the filler to your crown molding. If you have wood molding, caulk is good to use as an adhesive while using wood putty as a filler.
The Final Word
Putting in crown molding can be a complex project. You should get all your materials and tools beforehand and make sure you have a plan before you begin. It gets easier as you go along but it helps to have some guidance. If you do decide to tackle it, you can be rewarded with an elegant finish that looks professionally done.
Share this Post
Giovanni Valle is a licensed architect and LEED-accredited professional and is certified by the National Council of Architectural Registration Boards (NCARB). He is the author and managing editor of various digital publications, including BuilderSpace, Your Own Architect, and Interiors Place.