
Affiliate Disclaimer: Some of the links below are affiliate links. As an Amazon Associate, I earn from qualifying purchases.
Laminate flooring is a popular alternative to traditional wood flooring; high gloss laminate flooring looks gorgeous and is a budget-friendly alternative to hardwood floors. However, this option has several drawbacks, including signs of wear and tear, like scratches and scuffs, that are very noticeable. So, how do you get scratches out of high gloss laminate flooring?
To get scratches out of high gloss laminate flooring, you can use touch-up kits to fill in the damage or shoe polish to buff out the damage. Other options include using melted crayons, burn-in sticks, and toothpaste. Or you can simply replace the plank entirely.
If you have unsightly scratches on your floors, don’t worry. The rest of this article will examine how you can use touch-up kits or various items around your house to treat scratches on your high-gloss laminate floors.
How Do I Treat Scratches on High Gloss Laminate Flooring?
While the shiny finish of high gloss laminate flooring can be highly attractive, the shine also means the floor easily shows scruff, scrapes, and scratches. This is because light is easily reflected off the floor’s surface, highlighting any existing damage.
If you notice your floor showing significant scratches, the best way to treat the damage is with laminate touch-up kits.
What Are Laminate Touch-Up Kits?
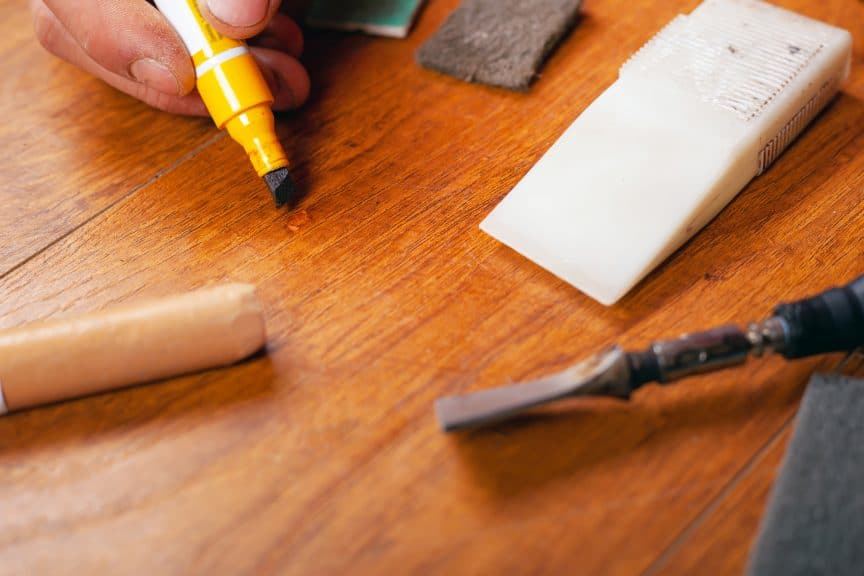
Laminate touch-up kits, like the Furniture Scratch Repair Wood Fillers, include either a marker, a filler crayon, or a pencil and varnish. They’re available in several different colors, allowing you to pick the one that best matches the color of your flooring.
Using a laminate touch-up kit is simple and easy:
- Select a kit that matches the color of your floors. If you can’t find one that matches your floor’s gloss, don’t worry – that part can be dealt with later.
- Start to fill in the scratch. You can use a marker to fill it in if it’s a minor scratch. Deeper scratches, however, will require you to use a kit with a pencil or crayon. Follow the attached instructions on how to use these tools, though most tend to be relatively self-explanatory.
- If your kit includes putty instead, use a putty knife to apply the filler.
- Once you’ve filled in the scratch, sand the area. You can use fine-grit sandpaper to complete this step. The sanding will help ensure the filler is at the same level as the flooring. Ensure you only remove the excess filler and stop before hitting your laminate’s surface.
- Once sanded down, wipe the laminate. Use a clean, damp cloth to do so. This will also help remove any sanding dust or excess filler that is left over.
- If the filler doesn’t match the shine of your laminate, apply varnish. Your touch-up kit should come equipped with a varnish, or you can buy one individually. Brush a thin line of varnish over the surface of the scratch, and then feather the edges to get an even, natural-looking finish.
- Once the varnish is dry, sand until the surface of your floor is completely even.
Can You Use Touch-Up Kits on Deep Scratches?
Laminate touch-up kits are also available for deep scratches. Such kits usually include a seam filler or putty alongside a touch-up marker. If you’re looking for suggestions, I recommend the Coconix Floor and Furniture Repair Kit.
While relatively similar to touch-up kits meant for shallower scratches, there are differences in how you’ll use these kits. Here’s how to get the most out of your touch-up kit when working on a deep scratch:
- Open a window before using the kit. This allows for better ventilation, which is key when using putty.
- Use cloth and acetone to clean the scratch thoroughly. Make sure to check the instructions first for other recommendations – if the kit specifically asks you to use another solvent for this step, follow those directions instead.
- Squeeze out some of the putty onto a paper plate. Depending on the type of filler, you may need to stir it gently with the accompanying putty knife until it starts to harden. For epoxy putties, you’ll need to mix the two ingredients according to the instructions until you get a uniform color.
- Use the putty knife to scrape the putty into the scratch. Make sure to go over the scratch twice to ensure the putty penetrates down to the bottom of the scratch.
- Clear away any excess putty.
- Rub the scratch using the same cloth you used in the second step. This will help remove any remaining putty you weren’t able to get rid of in the last step.
- Allow the putty to dry. You may need to apply a second coat if you notice it shrinks as it dries.
- Sand the surface with a fine-grit sandpaper. Make sure to stop sanding when the surface is smooth so you don’t remove any of the laminate.
- Touch up the color using the marker in the kit if necessary.
- Apply varnish to the scratch. This will ensure it matches the shine of the rest of the floor.
- Once the varnish is dry, sand the area until smooth once more.
Other Ways To Get Scratches Out of High Gloss Laminate Flooring
Laminate touch-up kits are convenient, but purchasing one isn’t always necessary. Especially if the scratches in your floor aren’t that deep. Here are some other options you can try to repair scratches to your high gloss laminate flooring using things you already have around the house.
Buff With Shoe Polish
This is a relatively simple process, and all you need is shoe polish and clean, lint-free cloth. Simply apply shoe polish of the same color as your floor to the scratch, and use the cloth to rub and buff the same way you would when shining a shoe.
Remember to use smooth, circular motions. Additionally, make sure not to add too much pressure to the cloth. Like with touch-up kits, you may need to add varnish and sand down the area in order to make sure the color of the scratch matches the rest of the floor.
Buff With a Floor Buffer
If your floor has sustained a number of scratches, buffing by hand can be time-consuming. Instead, you can use a floor buffer to do the job for you. Attach a buffing attachment to the buffer and use it to restore the shine to your floor.
To get rid of the scratches, use the buffer with a sanding screen attached to sand them out. However, if you do use this method, you’ll have to apply a touch-up finish to ensure the color is even.
Exercise caution when using a floor buffer. If you don’t pay attention to how much you’re buffing, you risk sanding through the finish or ruining the rest of your floor.
Use Melted Crayon
Crayons can actually make a good scratch treatment for your laminate floors in a pinch. Simply melt crayons that are the same color as your floor and dab them over the scratch.
The process for using melted crayons is remarkably similar to using filler pencils and putty. Just remember to wait until the crayon has cooled down before applying. Once applied, sand down with sandpaper and apply varnish if necessary.
Use Burn-In Sticks
Burn-in sticks are a special type of laminate touch-up kits that must be applied with an electric knife. To use, just heat the surface of the stick with an electric knife.
Once warm, rub the stick into the scratch, and remove any excess. Use sandpaper to level it down, and polish with varnish if necessary. Make sure the stick you’re using matches the color of your floors. There are several burn-in sticks available on the market, though I recommend Mohawk Quick Fill Burn-In Stick.
Dabbing With Toothpaste
If the scratch in question is particularly shallow, you may be able to use toothpaste to fix it. It’s as easy as dabbing the toothpaste on the surface of the scratch until it vanishes, then cleaning any residual toothpaste using water and vinegar. This method can also be used substituting WD-40 for the toothpaste.
Replacing the Plank
Sometimes, scratches are too deep for them to be fixed, and trying to fix or hide them will only cause more damage.
If this is the case with your floor, it’s best to just replace the affected plank or planks. If you lack flooring experience, I recommend you get a professional involved to help you in such a situation, as they can ensure the plank is replaced without causing additional damage to the surrounding area of flooring.
Conclusion
While scratch damage on high-gloss laminate flooring can seem unattractive, it isn’t necessarily the end of the world. There are several affordable remedies you can use to either fix or hide the issue.
However, it’s important to be realistic about the damage and opt for replacement if it’s unfixable. This way, you avoid creating issues on the rest of the flooring while you attempt to fix a single scratch.
Sources
- Bob Villa: Selecting the Right Sandpaper Grit and Type for Your DIY Job
- Wikipedia: Putty
- DetailingWiki: What is buffing
- Wikipedia: Varnish
- How Stuff Works: How Floor Buffers Work
- Wikipedia: WD-40
- Floor Techie: How Do You Remove Scratch Marks From Laminate Floors?
- The Spruce: What Are Laminate Floors?
- Floor Critics: High Gloss Laminate: Pros & Cons
- SF Gate: How to Fix Scratches on a Dark Wood Laminate Shiny Floor
- Hunker: Buffing Out Scratched Laminate Flooring
Share this Post
Giovanni Valle is a licensed architect and LEED-accredited professional and is certified by the National Council of Architectural Registration Boards (NCARB). He is the author and managing editor of various digital publications, including BuilderSpace, Your Own Architect, and Interiors Place.